
Complete guide to upgrading macOS from Catalina to Big Sur running on Windows with VMware
Before following anything in this guide, please be aware that you may be violating the Terms of Service, License, and/or EULA for Apple and VMware. You will be running Apple software on non Apple hardware and modifying VMware software. You are responsible for reading and accepting any Terms of Service or License agreements that accompany any software you download or install. I wouldn’t recommend doing this on a computer you don’t own, and I REALLY wouldn’t recommend doing it on a work computer.
It is critical you follow every step in this guide. If you don’t, it will not work. If you don’t get the expected result, you must stop and figure out why. If you proceed anyway, it will not work.
1) Update VMware
Update VMware to the latest version. At least 16.X. I have had very little luck recently with the build in updating tool. You can simply download the latest from https://www.vmware.com/go/getplayer-win and run the install from there.
2) Run Unlocker
Make sure you have the latest VMware Unlock/Patch tool from https://github.com/BDisp/unlocker/archive/3.0.3.zip and close any open VMware windows or applications. Extract the previously downloaded “VMware Unlock/Patch tool”. Right click “win-install.cmd” and select Run as Administrator. Pay attention to any output you see on your screen. This must be run successfully. 
3) Updating to Big Sur
Boot your virtual machine normally. Start the update to Big Sur. Follow this link if needed: https://apps.apple.com/us/app/macos-big-sur/id1526878132?mt=12
It requires a lot of space. You can clean things up, and even delete Xcode if needed. You can reinstall it after the upgrade. Get some coffee. Walk the dog. Find something to kill some time. When it is completely done, and booted, proceed to the next step.
4) Editing the VMX File
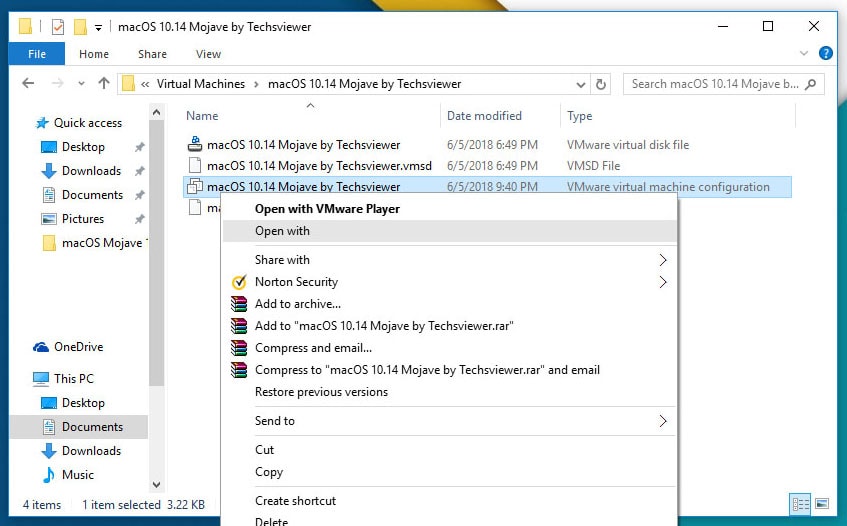
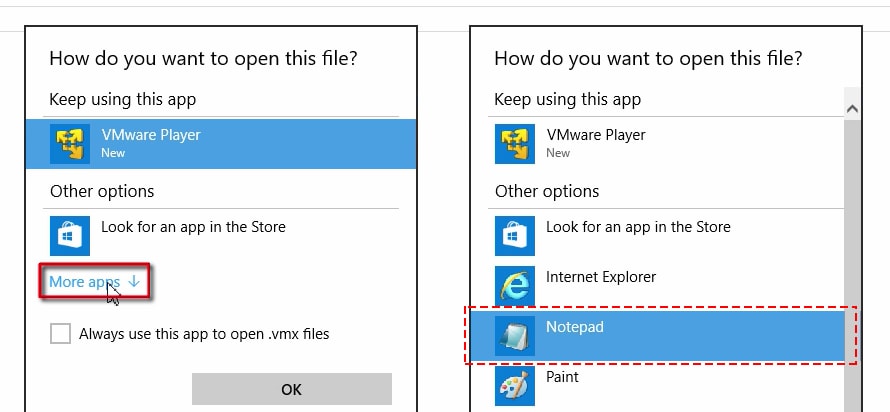
The VMX file contains some settings you can’t see in the normal VMware interface. You need to make one change. To edit it, open the folder that contains your virtual machine files. If you did not specify its location, look in Documents\virtual machines\. The first image below shows you where you find the path to this directory. Right click on the VMX file and choose “Open with”. Choose “More Apps”. From the list of apps that will be seen, choose “Notepad” and press Enter. The “type” for this file will be “VMware virtual machine configuration” **Do not try to open or edit the Virtual Disk (VMDK) file. You will get a message that it is too large to be opened in Notepad. You have to edit the VMware virtual machine configuration (VMX) file.

This will open the VMX file in Notepad. Use the find feature, and search for virtualHW.version
Change the number (if it isn’t 18) to 18, so it looks exactly like ths:
virtualHW.version = “18”
**Make sure these are straight quotes and NOT curly quotes like this ”
Save the file.
5) Update VMware OS settings
Open the settings for your virtual machine, click on options, and then change your operating system to macOS 11.0. See picture. 
That’s it. You should be bale to boot up your virtual machine now. You will see the normal prompts anyone would see when upgrading to Big Sur.
